| The eTextReader Project | ||||||
|
||||||
| The eTextReader Project | ||||||
|
||||||
There are two main ways that you can check out the most recent SVN version of the eTextReader project: using an SVN client, or through the Eclipse user interface.
Using an SVN client, you can check out a working copy of the eTextReader project into the current directory using the following command:
svn checkout https://etextreader.svn.sourceforge.net/svnroot/etextreader
This will create a subdirectory named etextreader in the
directory in which you ran the checkout command. Two projects will
then be contained in this subdirectory: E-Text Reader and Process
Textbook Page.
There are ant build files for these projects located in their respective directories that contain a number of targets.
Most development of the eTextReader project has occurred in Eclipse, and so we provide a framework for developing within Eclipse. To check out the project from the SVN repository using Eclipse, you'll need the Subclipse plugin installed. The steps to take to get the project from SVN are then as follows:
https://etextreader.svn.sourceforge.net/svnroot/etextreader
in the URL field.The SVN checkout process will take a while, but eventually you will have a working copy of the eTextReader application. It should build and execute
In order for Eclipse to be able to run the content server, you will need to
create a server configuration for the Process Textbook Page project. The Apache
Tomcat runtime is typically used. You can download and install the Tomcat runtime
at
http://tomcat.apache.org/download-55.cgi
When installing the Tomcat runtime, you should set it up to not start up automatically, since the server will be run from within the Eclipse environment, and port conflicts will likely occur if the Tomcat installation is set to run when the machine boots. Once you've successfully installed the Tomcat runtime, you can follow the tutorial at the Web Tools Project website:
http://www.eclipse.org/webtools/community/tutorials/BuildJ2EEWebApp/BuildJ2EEWebApp.html
Scroll down to the section labeled Choose a Server Runtime Environment and follow the instructions, up through the section labeled Developing the Application.
Once you have created the server runtime, you will need to add the Process E-textbook Page project ...
TODO: Complete this portion once we have a chance.
To be completed ...
Several launch configurations are provided with the SVN distribution. These configurations are as follows:
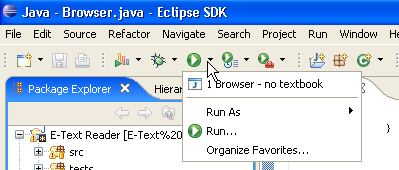
When the project is first downloaded from the SVN server, you will need to activate one of these launch configurations using the menu from within Eclipse. These configurations will subsequently be available in the favorites menu of your toolbar, as shown in the following diagram:
